Installing Combine
Combine has a number of server components, dependencies, and configurations that must be in place to work, as it leverages Apache Spark, among other applications, for processing on the backend. Combine installation using Docker manages most (but not all) of these dependencies for you.
The complete Linux Combine installation instructions are available as the last section on this page. The overview below is a good starting point for understanding the broad process.
Docker
A GitHub repository Combine-Docker exists to help stand up an instance of Combine as a set of interconnected Docker containers. This repository provides a "Dockerized" version of Combine. Combine is a Django application to facilitate the harvesting, transformation, analysis, and publishing of metadata records by Service Hubs for inclusion in the Digital Public Library of America (DPLA). The Combine-Docker repository includes detailed instructions for installing Combine on a linux server.How does it work?
Major components that support Combine have been broken out into distinct Docker images and containers. Using Docker Compose, each of these major components is associated with a Docker Compose service. Some share base images, others are pulled from 3rd party Docker images (like ElasticSearch and Mongo).
Docker Compose provides a way to interact with all the containers that support Combine at once, even providing some improved ability to view logs, restart services, etc.
The file docker-compose.yml contains most of the instructions used to describe the services and dependencies that comprise combine-docker.
Installation Overview
Installation and First Build
Downloading combine-dockerWindows only: An important git config before you download code!
Before you clone the repository on Windows, ensure that you have your git configured not to add Windows-style line endings. I believe you can do this by setting:
git config --global core.autocrlf false
Clone combine-docker
The first install step is to clone this repository and move into it:
git clone https://github.com/mi-dpla/combine-docker.git

cd combine-docker
Initializing combine-docker
The complete instructions include important information on upgrading an existing Combine server. Using the detailed instructions is strongly recommended. The complete Linux Combine installation instructions are available as the last section on this page.
Abbreviated InstructionsNOTE: All of the scripts assume you are building on Ubuntu 18.04 LTS.
Windows only: In the next step run build.ps1 instead of build.sh
Next, run the build.sh script:
./build.sh
Note: This script may take some time, anywhere from 5-20 minutes depending on your hardware. This script accomplishes a few things:
- initializes Combine Django app as Git submodule at ./combine/combine
- builds all required Docker images
- runs one-time database initializations and migrations
Configuration
Once a build is complete, configurations may be performed on Combine's localsettings.py. This file is found at ./combine/combine/combine/localsettings.py. This file will be maintained between upgrades.
Running and Managing
Ensuring that first_build.sh (or update_build.sh if appropriate) has been run, fire up all containers with the following:
docker-compose up -d
Logs can be viewed with the logs command, again, selecting all services, or a subset of:
tail all logs: docker-compose logs -f
tail logs of specific services: docker-compose logs -f combine-django combine-celery livy
As outlined in the Combine-Docker Containers section all services, or a subset of, can be restarted as follows:
To restart Combine Django app, background tasks Celery, and Livy:
docker-compose restart combine-django combine-celery
To restart everything: docker-compose restart
To stop all services and containers (Reminder: Do not include -v or --volumes flags, as these will wipe ALL data from Combine):
docker-compose down
To view stats of containers: docker stats
Basic Operations
This section assumes that combine installation was successful and the server web page is available at http://[server].[domain]/combine which we will indicate simply with combine.
SSHing into server
The most reliable way is to ssh into the server as an administrative user who can authenticate themselves:
ssh username]@[server].[domain]
Starting / Stopping Combine
>Docker-Compose
Once Combine is installed, docker-compose commands are used to start and stop the application. In the /opt/combine-docker directory use:
To start Combine: docker-compose up
To stop Combine: docker-compose down
You can confirm that Combine is running by visiting http://combine, where you should be prompted to login with a username and password. For default/testing installations, you can use combine / combine for these credentials.
Livy Sessions
Combine makes use of the DPLA’s Ingestion 3 codebase where possible. Like Ingestion 3, it relies on Apache Spark to process large numbers of records. Spark is a fast and general processing engine that can handle thousands of metadata records quickly. Apache Livy is a service that enables easy interaction with a Spark service over a REST interface. It enables easy submission and monitoring of Spark jobs from Combine.
This architecture allows users to submit records to Livy jobs (and hence to Spark) for batch processing and it makes Combine relatively fast and efficient, but adds a level of complexity by requiring Livy to run.
In Combine, only one active Livy Session is allowed at a time. This is partially for performance reasons, to keep Livy from consuming all of the server’s resources, and partially to ensure that Spark Jobs are run in an order
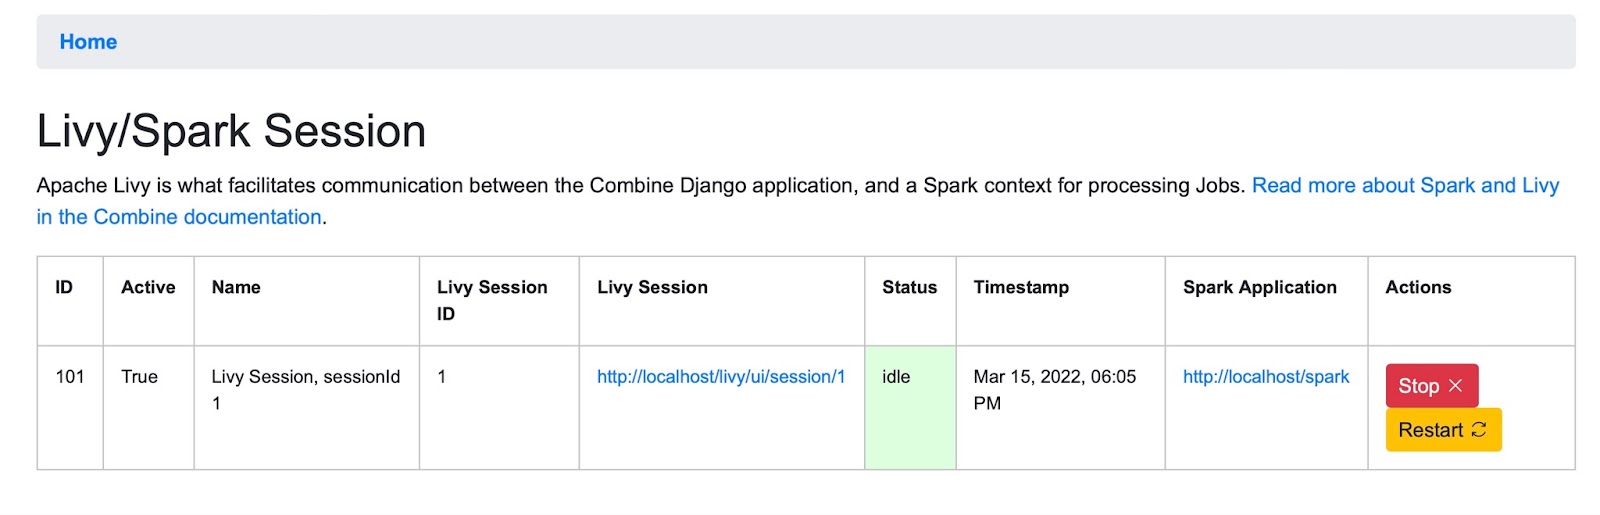
To run any Jobs, Combine relies on an active (idle) Apache Livy session. Livy is what makes running Spark jobs possible via the request/response cycle of a Django application.
Currently, users are responsible for determining if the Livy session is ready.
To check and/or start a new Livy session, select the System: Spark item in the navigation bar. The important column is status which should read idle. If not, click Stop or Remove under the actions column, and once stopped, click the start new session button near the top.
Removing and creating a new Spark Session will usually be unnecessary, but a user can resort to that option if the current Session cannot be restarted.

Livy takes anywhere from 10-20 seconds to start and become idle.
You can check the status of the Livy session at a glance from the Combine navigation bar, where the workSpark next to System should have a green colored lettering if active or red if it is not active.
Troubleshooting
Undoubtedly, things might go sideways! As Combine is still quite rough around some edges, here are some common gotchas you may encounter.
ElasticSearch container dies because ofvm.max_map_count
Depending on machine and OS (Linux, Mac, Windows), might need to bump vm.max_map_count on Docker host machine (seems to be particularly true on older ones): https://www.elastic.co/guide/en/elasticsearch/reference/current/docker.html#docker-cli-run-prod-mode
port collision error: port is already allocated
By default, nearly all relevant ports are exposed from the containers that conspire to run Combine, but these can be turned off selectively (or changed) if you have services running on your host that conflict. Look for the ports section for each service in the docker-compose.yml to enable or disable them.
java.lang.ClassNotFoundException: org.elasticsearch.hadoop.mr.LinkedMapWritable
Make sure that the elasticsearch-hadoop-x.y.z.jar in combinelib matches the version specified in the ELASTICSEARCH_HADOOP_CONNECTOR_VERSION environment variable configured in your env.
Run a job, status immediately flips to 'available,' and Job has no records
The best way to diagnose why a job may have failed, from the RecordGroup screen, is to click “Livy Statement” link under the Monitor column. This returns the raw output from the Spark job, via Livy which dispatches jobs to Spark.
A common error is a stale Livy connection, specifically its MySQL connection, which is revealed at the end of the Livy statement output by:
MySQL server has gone away
This can be fixed by restarting the Livy session.
Cannot start a Livy session
Information for diagnosing can be found in the Livy logs at /var/log/livy/livy.stderr.
Updating
This Dockerized version of Combine supports, arguably, easier version updating because major components, broken out as images and containers, can be readily rebuilt. Much like the repository Combine-Playbook, this repository follows the same versioning as Combine. So checking out the tagged release v0.11.1 for this repository, will build Combine version v0.11.1.
To update, follow these steps from the Combine-Docker repository root folder:
# pull new changes to Combine-Docker repository
git pull
# checkout desired release, e.g. v0.11.1
git checkout v0.11.1
# run update build script
./update_build.sh
# Restart as per normal
docker-compose up -d
Docker Services and Volumes & Binds
This Dockerized version of Combine includes the following services, where each becomes a single container:
| Service Name | Notes |
|---|---|
| host machine | not a container, but part of internal network |
| elasticsearch | |
| mongo | |
| mysql | |
| redis | |
| hadoop-namenode | |
| hadoop-datanode | |
| spark-master | not currently used |
| spark-worker | not currently used |
| combine-django | |
| livy | location of spark application running in local[*] mode |
| combine-celery |
The following tables show Docker volumes and binds that are created to support data sharing between containers, and "long-term" data storage. The column Data Storage indicates which volumes act as data stores for Combine and should not be deleted (unless, of course, a fresh installation is desired). Conversely, the column Refreshed on Upgrade shows which tables are removed during builds. Note: this information is purely for informational purposes only; the build scripts and normal usage of docker-compose up and docker-compose down will not remove these volumes.
| Volume Name | Type | Source | Target | Data Storage | Refreshed on Update | Associated Services |
|---|---|---|---|---|---|---|
| esdata | namedvolume | n/a | /usr/share/elasticsearch/data | TRUE | elasticsearch | |
| mongodata | namedvolume | n/a | /data/db | TRUE | mongo | |
| mysqldata | namedvolume | n/a | /var/lib/mysql | TRUE | mysql | |
| hdfs | namedvolume | n/a | /hdfs | TRUE | hadoop-namenode,hadoop-datanode | |
| combine_home | namedvolume | n/a | /home/combine | TRUE | [spark-cluster-base] | |
| combine_django_app | bind | ./combine/combine | /opt/combine | TRUE | combine-django,combine-celery,livy | |
| combine_python_env | namedvolume | n/a | /opt/conda/envs/combine | TRUE | combine-django,combine-celery,livy | |
| hadoop_binaries | namedvolume | n/a | /opt/hadoop | TRUE | [spark-cluster-base] | |
| spark_binaries | namedvolume | n/a | /opt/spark | TRUE | [spark-cluster-base] | |
| livy_binaries | namedvolume | n/a | /opt/livy | TRUE | [spark-cluster-base] | |
| combine_tmp | namedvolume | n/a | /tmp | TRUE | [spark-cluster-base] |
Development
The Combine Django application, where most development efforts are targeted, is a bind mount volume from the location of this cloned repository on disk at ./combine/combine. Though the application is copied to the docker images during build, to support the installation of dependencies, the location /opt/combine is overwritten by this bind volume at docker-compose up or run. This allows live editing of the local folder ./combine/combine, which is updating the folder /opt/combine in services combine-django, combine-celery, and livy.
The folder ./combine/combine can, for the most part, be treated like a normal GitHub repository. For example, one could checkout or create a new branch, and then push and pull from there.
Automated Testing
Combine itself has automated tests. If you want to run them from inside here, you will need to uncomment the ports sections for mysql and mongo in docker-compose.yml, and you will also need to edit your /etc/hosts file to redirect mysql and mongo to 127.0.0.1. This is because the host machine needs to have access to the databases for the Django test runner to set up and tear down around each run.
Tuning and Configuring the Server
Combine is designed to handle sets of metadata small to large, 400 to 4,000,000 Records. Some of the major associated server components include:
- MySQL
- store Records and their associated, full XML documents
- store Transformations, Validations, and most other enduring, user defined data
- store transactions from Validations, OAI requests, etc.
- ElasticSearch
- used for indexing mapped fields from Records
- main engine of field-level analysis
- Apache Spark
- the workhorse for running Jobs, including Harvests, Transformations, Validations, etc.
- Apache Livy
- used to send and queue Jobs to Spark
- nginx
- a web server
- Django
- manage the web user interface
- Django Background Tasks
- for long running tasks that may that would otherwise prevent the web user interface from being responsive
- includes deleting, re-indexing, exporting Jobs, etc.
Given the relative complexity of this stack, and the interconnected nature of the components, Combine is designed to be deployed using Docker, which automatically pulls updated component images at installation. The default build requires 8g of RAM, with the more CPU cores the better.
This part of the documentation aims to explain, and indicate how to modify or configure, some of these critical components.
Step by Step Linux Installation Instructions for Combine-Docker
Introduction
Combine is an application to facilitate the harvesting, transformation, analysis, and publishing of metadata records by Service Hubs for inclusion in the Digital Public Library of America (DPLA).
These technical instructions are for metadata experts or system administrators who wish to install Combine on their institution’s servers to process and publish metadata records to DPLA. Version 0.11 includes a number of bug fixes and improvements.
Help is available for combine installation at combine-support@umich.edu. You can also add issues to the combine github at https://github.com/MI-DPLA/combine.
Assumptions
- A linux server on which you have superuser privileges (can run sudo commands).
- Instructions tested on Ubuntu 18.04; not guaranteed to work on other Linuxes, but likely to work on later Ubuntus
- These instructions are for installing v0.11.1 of Combine which requires docker and includes steps for migrating from an earlier version of Combine. The Vagrant/Ansible installation options are no longer available.
- Enough space to run the old and new Combines while migrating data, plus the space needed for the exported state data files from the older version. Also, some of the docker images are large!
- There are conditional instructions for various errors you may encounter. If you find additional errors or have suggested improvements please let us know so we can improve these instructions at at combine-support@umich.edu.
Installing Combine-Docker
- Clone the git repository h ttps://github.com/MI-DPLA/combine-docker.git somewhere. We chose /opt/combine-docker for symmetry with the old method
- Make sure that dependencies are installed:
- Docker
- sudo apt update
- curl -fsSL https://download.docker.com/linux/ubuntu/gpg | sudo apt-key add -
- sudo add-apt-repository "deb [arch=amd64] https://download.docker.com/linux/ubuntu bionic stable"
- sudo apt update
- sudo apt-get install docker-ce
- Add the relevant user account(s) to the docker group: sudo usermod -aG docker ${USER}
- (This is necessary to run docker commands without sudo, which we need for docker-compose basically).
- Docker-compose
- sudo curl -L "https://github.com/docker/compose/releases/download/1 .25.5/docker-compose-$(uname -s)-$(uname -m)" -o /usr/local/bin/docker-compose
- sudo chmod +x /usr/local/bin/docker-compose
- Subversion (needed to pull down the Spark/livy static files without pulling down the entire repository)
- sudo apt-get install subversion
- Log out and log back in so that the group change sticks
- CD to your combine-docker directory and make sure you have permission to edit it.
- Maybe change the group to the docker group?
- Maybe consider having a service account?
- You may also need to change the owner to yourself? (We had to do this at the University of Michigan.
- git checkout master
- Run the build.shscript
- You might get a lot of warnings. Most of these are fine to ignore (for instance, Livy wants to build off a Zinc server, but nothing bad happens when it doesn’t find one)
- If you get dns failures:
- One way to resolve this might be to add the config file at the path
/etc/docker/daemon.jsonwith the following contents: { “dns”: [“{your dns server address}”] } and then
- sudo systemctl reload docker sudo systemctl restart docker
- iIf the daemon.json file does not exist on your machine already, you will have to create it at the path
/etc/docker/daemon.json - You can test if dns is even kind of working with docker run busybox /bin/sh -c “nslookup github.com” If it times out, nothing at all is working
- If step (a) doesn’t fix the problem, look up something to do with docker and resolved
- Run the build.shscript again if you had to resolve dns failures.
- If it is endlessly waiting for MySQL container to be ready:
- The script that happens in is:
combine-docker/combine/combine_db_prepare.sh - Try running each of those commands in that shell script in order using the command template “docker-compose run combine-django /bin/bash -c “${command}””
- Once you’ve successfully done all the db-preparing, proceed to the next step.
- Run the buildstatic.shscript.
- Change nginx’s/docker-compose’s exposed ports to ones not in use by your server’s existing applications (e.g., change ‘127.0.0.1:80:80’ to ‘28080:80’ in docker-compose.yml to expose host port 28080, or pick some other port not already in use). Note that you do not need to change the listen port in nginx.conf, because docker is taking the traffic sent to port 28080 on the host and redirecting it to the nginx docker image’s port 80, where nginx is actually listening.
- Try docker-compose up. Repeat the port-changing process for anything that errors out as conflicting (most other ports live in docker-compose.yml).
- Try going to ${url}:28080/combine (or whatever port) in a browser to confirm that your docker combine is working; log in with user combine and password combine
- Background: Exporting and Importing of “States” in Combine is the ability to select various level of hierarchy (Organizations, Record Groups, and/or Jobs), and optionally Configuration Scenarios (OAI Endpoints, Transformations, Validations, etc.), and export to a fully serialized, downloadable, archive file. This file can then be imported into the same, or another, instance of Combine and reconstitute all the pieces that would support those Jobs and Configurations.
- If your old Combine has more than one user account, make sure you create the SAME NUMBER OF USERS for your new Combine. This is an unfortunate required workaround for the moment to import your existing Combine data. To add users to the new Combine:
- Use the “Configuration” menu item in the top navigation bar then the “Django Admin Console” button at the top of the page. Then click “Home” in the breadcrumbs bar to get to the Django administration page and click the U sers link. OR
- Enter ${url}:28080/admin into your browser’s address bar to get to the Django administration page and click the Users link.
- If everything’s working, try exporting everything from your old Combine:
- You can get to State Export/Import using the “Configuration” menu item in the top navigation bar then scroll down to the bottom of the page to find the “State Export/Import” button. OR
- At $ {url}/combine/stateio/export (type this into your browser address bar).
- Click the Export State button and on the next page select everything you want to export and again click the ExportState button.The export process may take a while or get stuck if it runs out of space.
- This is a point at which you might run out of disk space and may need to work with your system support to have more allocated.
- Now you will need to find the export on disk and put it somewhere that the new Combine can see. In theory, with all settings at default, the following should work:
- docker exec -it combine-docker_combine-django_1 /bin/bash
- cd /home/combine/data/combine/stateio/exports (or the
- STATEIO_EXPORT_DIR from localsettings.py)
- Find the .zip file you just created
- cp ${blah}.zip /opt/combine (/opt/combine in both combine-django and combine-celery should be the same mapped docker volume)
- Go to import page and import from filesystem with path
/opt/combine/${blah}.zip” - If your version of Combine is old enough that it still has the bug where jobs with no upstream or downstream job can’t be exported, you can work around that by creating a meaningless Analysis Job that takes all the singletons as inputs.
- Each imported job has a button that allows you to rebuild the elasticsearch index for that job. (We at Michigan are looking into a more global way to do this.)
Migrating data from previous versions of Combine
Next: The Command Line